Introduction

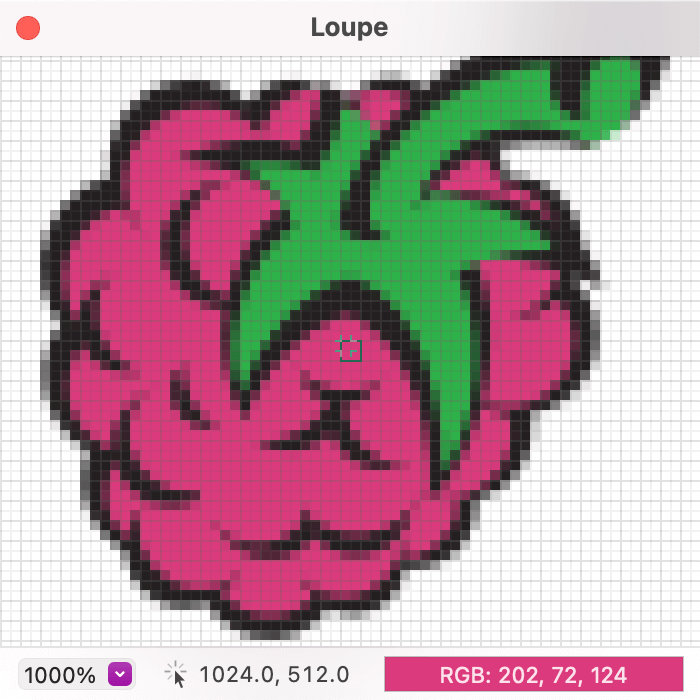
Loupe’s primary function is to magnify your computer’s screen in a pixel accurate manner. And what does pixel accurate mean? Well, at 1,000% zoom, a question mark could look like the image to the right.
You’ll probably notice how blocky the question mark looks. This is intentional and what is meant by “pixel accurate”.
The reason this is done, rather than smoothing out the jagged edges, is to allow you to easily see the exact pixels that makeup your screen. With the help of grid lines, you’ll be better able to determine if on-screen elements are aligned, sized, and placed as intended. This is especially helpful on high-resolution screens on which these details aren’t easily visible to most people without aid. Loupe aims to provide this aid to anyone who needs it.
Loupe also provides a fully custom color picker for when you need to adjust the colors of what you’re inspecting in the magnifier. With the ability to save colors, mix them together, and create harmonious color pairs, the color picker can quickly become an indispensable tool.
Magnifier
The magnifier mainly shows a magnified view of your computer’s screen, centered on the current target location (the same as your mouse cursor’s location by default), as well as several bits of useful information that are visible by default.
When the magnifier is front-most and accepting keyboard input, you can use your keyboard’s arrow keys to move the target location that the magnified view is centered on by one pixel at a time. This distance can be changed by holding the Shift key down while using the arrow keys, increasing movement to 10 pixels at a time.
Using the pinch-to-zoom gesture on a trackpad (or similar) while the magnifier is front-most will change the zoom level of the magnified view.
Scrolling in the magnifier with a mouse wheel, or with the corresponding gesture on a trackpad (or similar), will allow you to move the target location in a way that is very similar to scrolling a document or webpage. Performing the same scrolling action while holding the Control key will instead change the current zoom level. Both of these behaviours are customizable in the Settings window.
Since the magnifier can have its title bar hidden, the window can be moved by dragging from anywhere inside the window’s magnified view (by default, the alternative being to make a selection). You can also Control / right-click anywhere in the window to quickly access the View menu for various customization options.
Starting with macOS 10.15 (Catalina), you will be asked to grant Loupe permission to record your screen the first time you launch Loupe and anytime afterward when you try to open the magnifier when permission hasn’t been granted. Without this permission, Loupe is only able to magnify its own interface and your desktop picture.
Despite screen recording permission being granted, Loupe is not a screen recorder; the images of your screen that are captured are kept only long enough to draw them back to your screen in a magnified form, or copied to your clipboard when you want.
While the magnifier won’t be able to function without screen recording permission, the color picker can still be used, you just won’t be able to capture the color of the pixel the mouse is pointing at. If you wish to use the magnifier, you can grant Loupe screen recording permission in System Settings (System Preferences in macOS 12 and earlier), as described by the below alert.
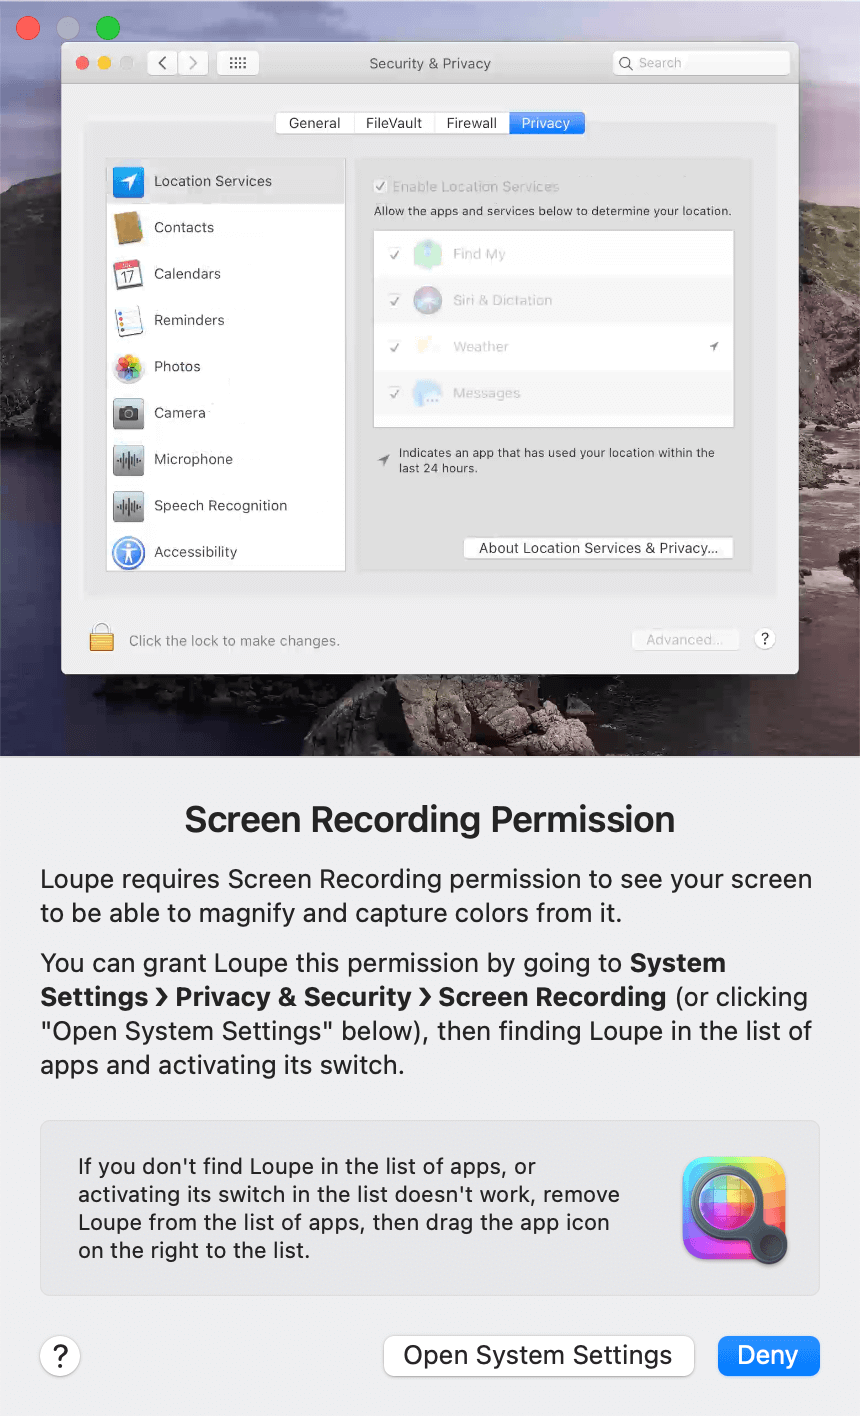
Pressing “Open System Settings” will open Privacy & Security in System Settings where you’ll need to navigate into the Screen Recording options, allowing you to activate the switch to the right of Loupe’s icon. Once this is done, you’ve successfully granted Loupe’s magnifier the permission it needs, and it will start to function immediately.
The top portion of the alert is a short, looping animation that shows the steps needed (after the “Open System Settings” button is clicked) to grant the permission Loupe wants.
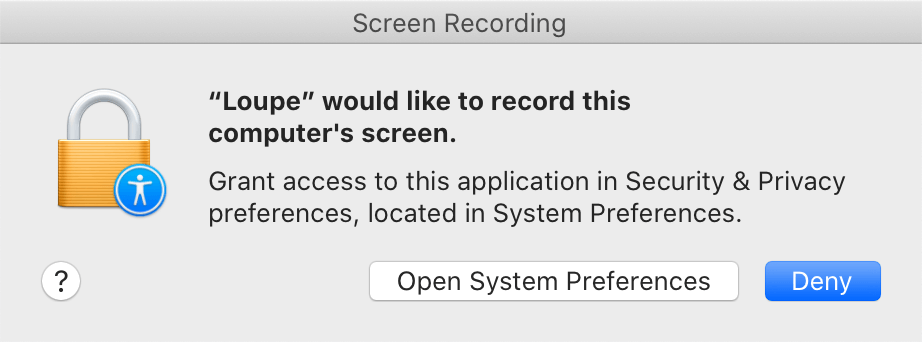
The system may show the below alert around the same time Loupe shows its own. You may either click “Open System Preferences” (”Open System Settings” in macOS 13 and newer) in the system alert, or press “Deny” to dismiss the alert and follow the instructions provided in Loupe’s alert (above).
Information View
 123
123- Current Magnification Level
- The current magnification (zoom) level allows you to change the zoom level to one of several predefined values with its menu, or any value you type in its text field between 100% – 5,000%.
- Target Location
- The coordinates of the magnifier’s target location are displayed in points (not pixels) relative to the screen the target is on, with the coordinates [0, 0] being the top-left corner of the screen. Points are used instead of pixels as they are a resolution independent unit which helps with measurements between low- and high-resolution screens.
- Current Pixel’s Color
- The current pixel’s color field shows the color of the targeted pixel and defaults to describing it with the RGB color format. This color can be dragged from the color field.
You can choose a different color format from the color field’s context menu (Control / right-click on the field to show the menu), or change the “Active Format” in the Settings window.
Selections
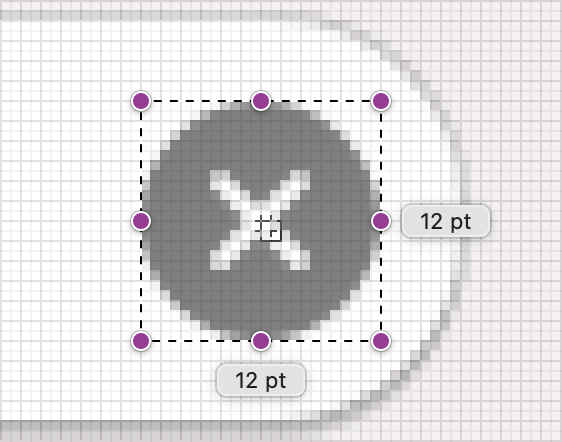
By default, you can hold the Command key down while you click and drag inside the magnified view to select a rectangular region that has its width and height displayed. Selections are used to aid with measurement and alignment of on-screen elements (buttons, text, images, etc.), and also designate what pixels can be copied.
Once you have a region selected, you are able to resize the selection using the resize handles (, if they’re enabled in the Settings window) and drag the selection around.
Selections are anchored to the pixels that they are drawn atop. When the magnified view is following the mouse cursor, selections can be made but cannot be resized or moved. For this reason, you’ll probably want to turn the “Follow Mouse” option off when working with selections.
To remove the selection, Command-click (by default, depends on your settings) anywhere inside the magnified view that is outside the selection, or choose “Clear Selection” from the Edit menu.
You can customize both how selections are created, and with what unit selections are measured, in the Settings window.
Clipboard Support
Both the Edit menu and the status bar menu give you the option to either “Copy” or “Copy Image”, while the current pixel color field’s context menu gives you the option to “Copy Color”.
| Action | Description |
| Copy | Copies either the clipboard format of the current pixel’s color, or the part of the magnified image that is currently selected if a selection exists. When a selection exists, this menu option will be renamed to “Copy Selection” for clarity. You can hold the Option key down while choosing this action to force the clipboard format to be copied, ignoring any selection that may exist. |
| Copy Color | Copies the clipboard format of the current pixel’s color. |
| Copy Image | Copies the entirety of the magnified view as an image. |
Whenever an image is copied, it will be at the same magnification level as the magnified view, and neither the pixel grid nor the target location will be present.
View Menu
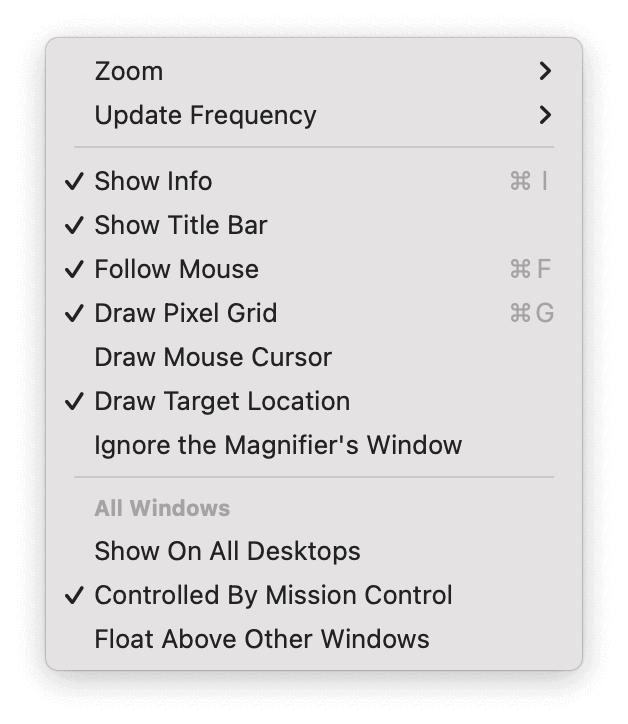
- Zoom
- A sub-menu letting you increase or decrease the current zoom level, or choose one of several predefined levels.
- Update Frequency
- To magnify the screen, Loupe periodically captures the portion of the screen it needs to enlarge and display in the magnifier. By default, Loupe does this 15 times per second, but this frequency can be reduced to once per second or increased to 60 times per second (with a few steps in-between) depending on what is selected in this sub-menu.
- Show Info
- Toggles the information view.
All Windows
The below three items apply to all main windows (ie. the magnifier and color picker).
- Show On All Desktops
- If you have multiple workspaces, show Loupe’s windows on all workspaces as you switch between them.
- Controlled By Mission Control
- When invoking Mission Control to show all of the windows on your computer, or to reveal the desktop, Loupe’s windows will remain in their place when this option is inactive.
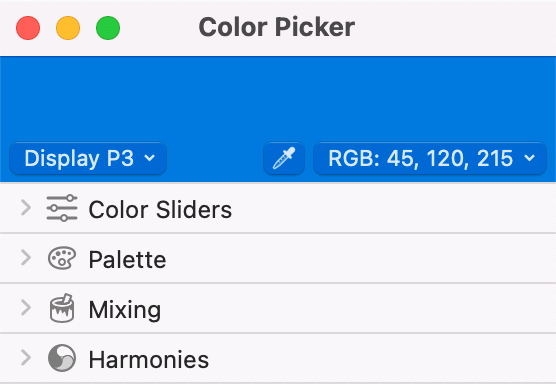
Color Picker
 12
12Made up of a large color preview well 1 and several collapsible sections 2, the color picker allows for easy and accurate color modification and storage. The color preview well shows the color picker’s current color, and also includes (as shown, from left to right):
- Color space selector:
- The color space selector drop-down menu button allows you to choose the color space you wish to work in for the color model you have selected. The “device” color spaces for RGB and CMYK are selected by default and are what older versions of Loupe always used.
- Color sampler:
- When pressed, the color sampler button will show a magnified view of your screen attached to your mouse cursor, allowing you to choose the color of any pixel on your screen by clicking on it.
- Color output display button:
- The color output display drop-down menu button will always describe the current color using the active color format’s display format. Clicking the button shows a menu that allows you to easily change the active format, rather than having to change it in the Settings window.
You can drag the color from the color preview well, or drop another color onto it to set the current color. Text that matches any of the available color formats can also be dropped onto the well to have the text parsed as a color.
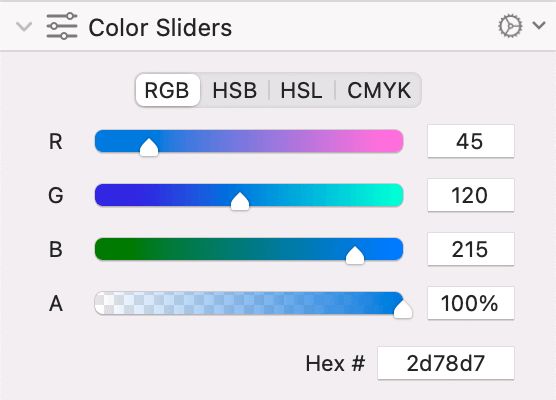
Color Sliders
 123
123The color sliders section allows you the edit the current color in a few different color models 2 using the sliders and value fields 3. The RGB color model shows the current color in hexadecimal format in the text field labeled “Hex #”, while the other color models do not.
Using the section’s options menu 1 (the button labeled with a gear icon ““ in the section’s header), you can set the value fields to use floating point values (0.0 – 1.0) instead of the default 8-bit integer values (0 – 255).
The CMYK color model edits colors in its own color space, while the other models work in the RGB color space. Because of this, when switching the current color from the RGB color space to the CMYK color space, the color can change quite dramatically due to the CMYK color space not being able to accurately represent all of the colors in the RGB color space. This switch happens the moment you make a change to one of the value fields or a slider. You can always undo this switch if it turns out to be undesirable.
Palette
 12
12The palette section allows you to easily store as many colors as you want for later use. You can even import and export the colors using the section’s options menu 1 (the button labeled with a gear icon ““ in the section’s header).
Storing colors in the palette is very simple. You can either drag a color (or text that matches any color format) into the palette anywhere in the current set of stored colors, or press the add color button 2 to store the color picker’s current color. The colors can also be rearranged via drag-and-drop, as well as duplicated by holding the Option key while dragging.
Deleting a color from the palette can be done by either dragging the color to the trash, or Control / right-clicking the color and choosing “Delete” from its context menu.
Colors can be exported in either Loupe’s own text-based format (.json), Apple Color List (.clr) format, Adobe Swatch Exchange (.ase) format, or GIMP Palette (.gpl) format. Exported colors are always in the generic RGB color space (color profiles are not exported with the colors).
You can import colors from Loupe’s own text-based format (.json) files, Apple Color List (.clr) files, Adobe Swatch Exchange (.ase) files, Adobe Color Swatch (.aco) files, and GIMP Palette (.gpl) files. When importing from the two Adobe swatch file formats, colors in the CIELAB color space could be encountered which need to be converted to the RGB color space before import. This requires you to specify the import options you wish to use.
Importing CIELAB Colors
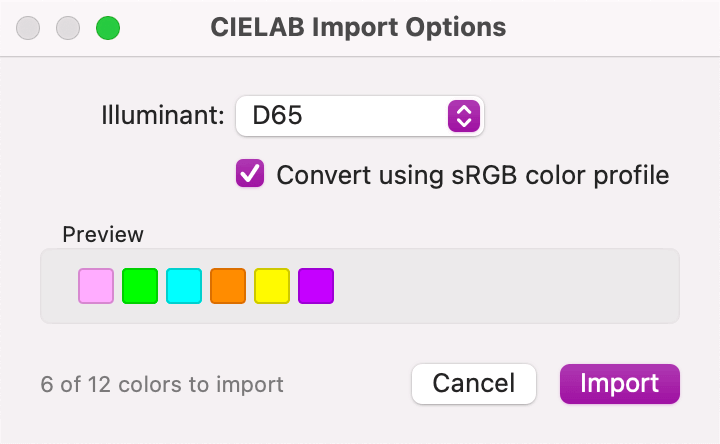
The CIELAB color space can represent many more colors than the RGB color space used by Loupe’s color picker to store colors. Because of this, when colors in the CIELAB color space are imported, they first need to be converted to RGB, but this conversion is inherently lossy (information about the colors will be lost). Since Loupe has no way of knowing what information is important, you must specify what is referred to as the illuminant. If you don’t know what that means, the default illuminant “D65” is recommended.
Aside from choosing the illuminant to use, you can also choose whether or not to use the sRGB color profile during conversion.
Below the import options, you’ll find a preview of the CIELAB colors that are going to be imported as they’ll appear using the selected import options, giving you the opportunity to find the correct options. Below the preview, you’ll see how many colors are CIELAB colors out of the total number of colors that will be imported.
Pressing “Cancel” will cancel the entire import operation, leaving the set of stored colors in the color picker’s palette section unmodified.
Mixing
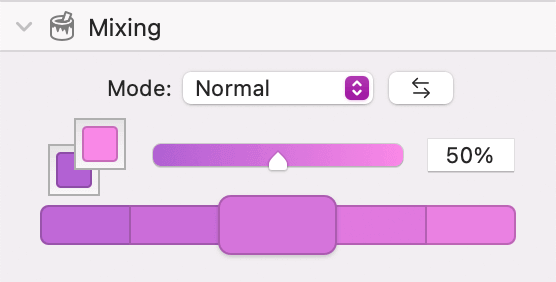 13245
13245The mixing section is used to blend two colors together using blend modes, which can be chosen in the mode popup menu 1.
Choosing the colors to blend together can be done by setting the colors in the blending color wells 2, either by dragging colors onto them, or by clicking (to select) them and adjusting the color picker’s current color. If you clicked one of the color wells to edit its color, you can deselect it by clicking the well again to stop editing its color. The foreground color is in the top (upper-right) color well, while the background color is in the bottom (lower-left) color well. You can swap the foreground and background colors by clicking the swap button 3.
Using the specified blend mode, the foreground color is blended onto the background color by the amount in the blend amount 4 slider & text field.
The result of the blending is shown in the middle section of the multi-color color well 5 which can be clicked to set the current color, or can be dragged out. To the left and right of the middle section are additional blending results that are 15% and 30% different from the current blend amount in both directions. Clicking these will set both the color picker’s current color and the current blend amount.
Harmonies
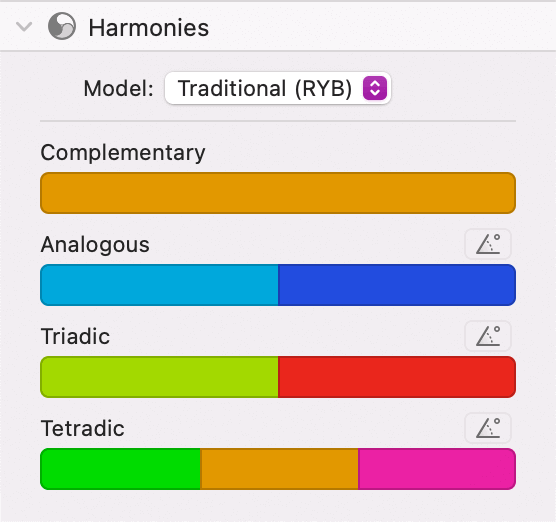 12
12The harmonies section offers several types of color harmonies based on the color picker’s current color. Complementary, analogous, triadic, and tetradic harmonies are available in multi-color color wells that can be clicked to set the current color, or can be dragged out. By default, the harmonies are calculated using the more traditional color model of red-yellow-blue, but the more accurate model of red-green-blue is available in the model popup menu 1.
The complementary color has the opposite hue of the current color, while the last three harmonies have hues that are adjusted by specified amounts. Analogous colors are two colors that are 30° apart from each other centered on the base color, and triadic colors are two that are 120° apart from each other. Tetradic colors are four colors made up of one that is 90° away from the complementary color, the complementary color itself, and a color that is 90° away from the base color. All of these angles are adjustable by pressing the angle popover button 2 by the set of colors you wish to adjust.
 12
12The angle popover (opened by clicking the above angle popover button) allows you to adjust the corresponding harmony’s angle value using either the circular handles 1 of the large, round color slider (a dark diamond represents the base color, while a light diamond represents the complementary color), or an editable text field 2.
The button labeled “Reset” will set the angle back to its default value for the corresponding harmony, and the button labeled “Done” closes the popover.
Draggable Colors
Many controls in Loupe allow you to drag colors from them, such as the current pixel’s color field of the magnifier’s information view, and any of the color picker’s various color wells. These colors can then be dropped into many useful locations, including:
- any of the color picker’s color wells that accept input,
- the macOS system color picker’s list of favorite colors,
- any text field in any app to get the color’s clipboard format,
- Xcode (to get a Swift color descriptor), and
- anything that accepts an NSColor object.
Any part of the color picker that accepts dropped colors will also accept dropped text that matches the clipboard format of any of the available color formats.
Settings
If Loupe’s settings ever wind-up in an undesirable state and you’d like to reset them back to their defaults, you can hold the Control and Option keys down while launching Loupe.
You’ll be asked if you want to go ahead with the reset, and have the option to export the color picker’s palette and the set of color formats before the reset occurs.
General
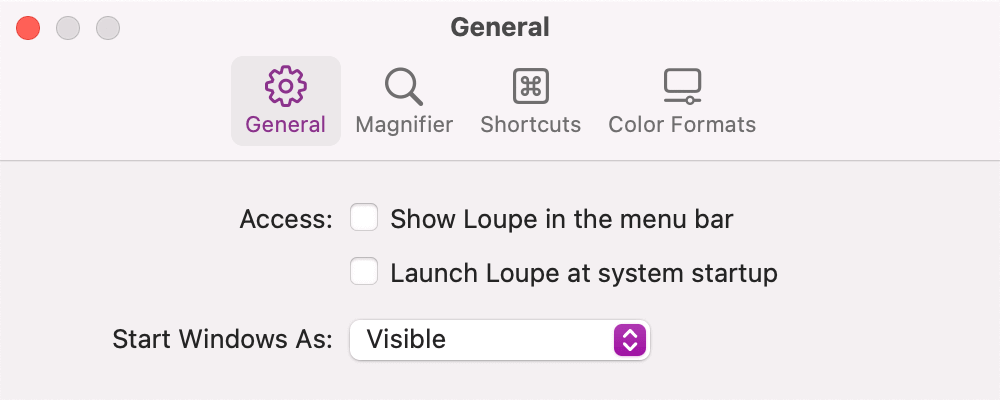
| Option | Description |
| Show Loupe in the menu bar | The Dock icon will be hidden and an icon will be added to the status bar (the set of icons on the right-hand side of the menu bar). There will also no longer be an application menu bar for Loupe; the icon will give you access to necessary functionality in a menu (like quitting or opening the Settings window) instead. |
| Launch Loupe at system startup | Loupe will launch automatically when your computer starts. |
| Start Windows As | Choose the state of Loupe’s windows when Loupe is launched.
|
Magnifier
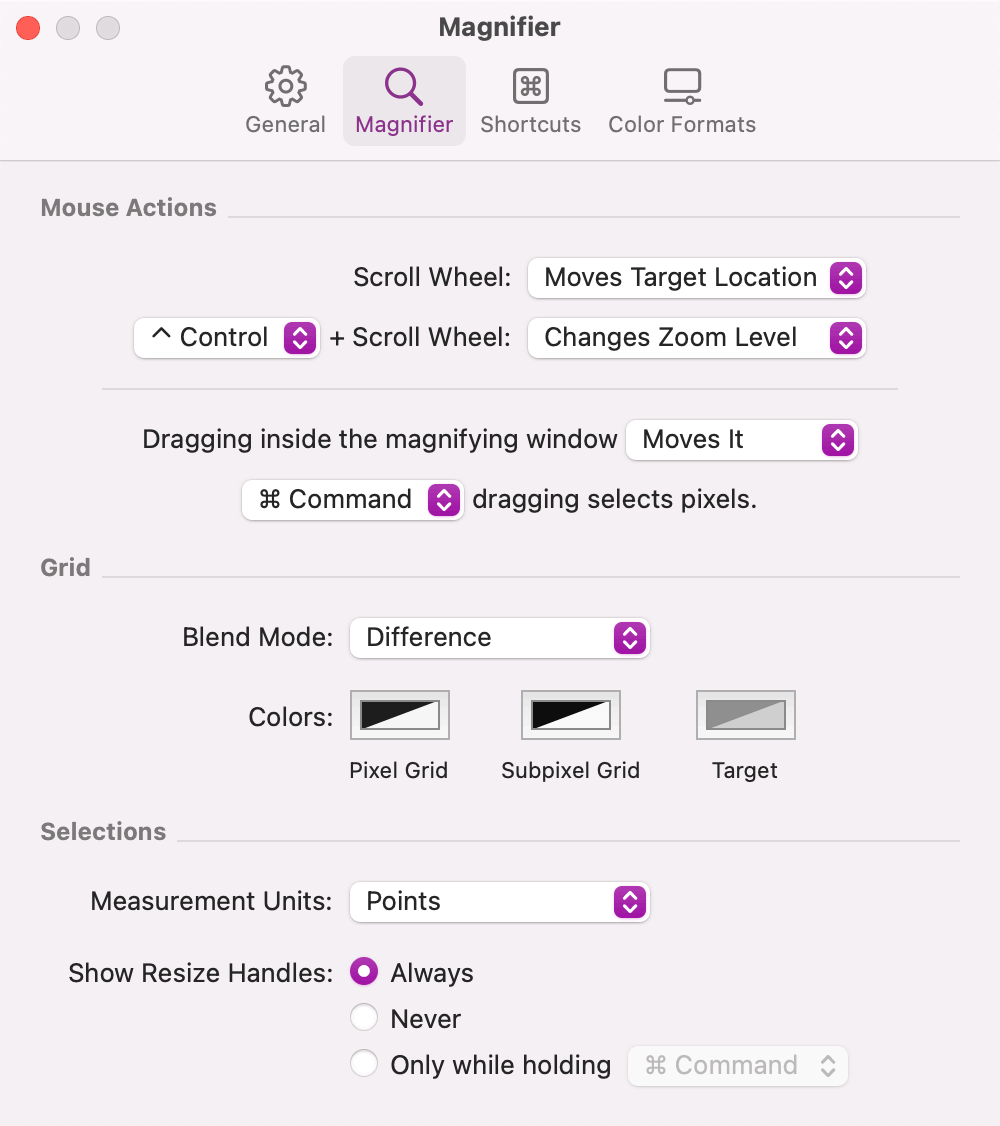
Mouse Actions
| Option | Description |
| Scroll Wheel | Choose what happens when you scroll inside the magnifier’s window with either a mouse’s scroll wheel or a gesture on a trackpad (or similar).
|
| Modifier + Scroll Wheel | The exact same three options as above apply here as well, except you need to hold the specified modifier key down to get chosen behaviour. You can choose either Command, Option, or Control as the modifier. |
| Dragging inside the magnifying window | Choose what happens when you click and drag inside the magnifier’s window.
|
| Modifier dragging selects pixels/moves the window | Which modifier key to hold down to reverse the above dragging behavior. You can choose either Command, Option, or Shift. |
Grid
| Option | Description |
| Blend Mode | The blend mode determines how the pixel grid is drawn onto the magnified view. Depending on what grid colors you choose (in the “Colors” options below), you may want to try the different modes as the default blend mode of “Difference” may not work well. For instance, when the grid colors are white, the “Difference” blend mode results in the underlying pixels of the magnified view being inverted. However, when the grid colors are black, the grid is entirely invisible with the “Difference” blend mode. For a technical description of the blend modes, you can refer to Apple’s developer documentation on the subject. |
| Colors | Click the color wells to change what colors the pixel grid and target location are drawn with. The default colors are:
|
Selections
| Option | Description |
| Measurement Units | Choose the measurement unit used to display the size of selections. |
| Show Resize Handles | Choose whether resize handles on selections should be shown always, never, or only while a specified modifier key is held. You can choose either Command, Option, or Shift. |
Shortcuts
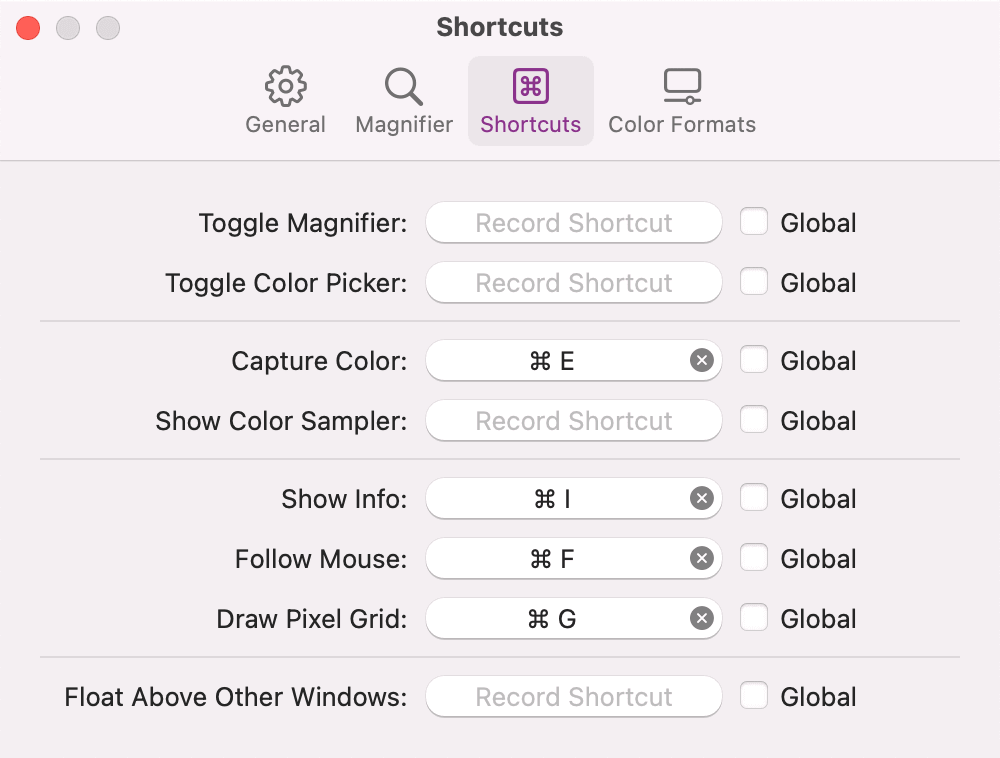
By clicking in the fields that say “Record Shortcut” (or that already show a keyboard shortcut), you can then press an unused keyboard shortcut on your keyboard to assign that shortcut to the action listed to the left of the field. Fields that have a defined shortcut also have a button () that, when clicked, will remove the shortcut.
Permission can be granted to Loupe to allow it to make any of these defined keyboard shortcuts work system wide on your computer by checking the “Global” box to the right of the shortcut fields.
| Action | Description |
| Toggle Magnifier | Toggles the visibility of the magnifier window. |
| Toggle Color Picker | Toggles the visibility of the color picker window. |
| Capture Color | Captures the color of the pixel the magnifier is targetting, giving it to the color picker to edit. |
| Show Color Sampler | Activates the color picker’s color sampler. Only available in macOS 10.15 and newer. |
| Show Info | Toggles the magnifier’s information view. |
| Follow Mouse | Makes the magnifier target the mouse cursor. See the view menu option of the same name for more details. |
| Draw Pixel Grid | Toggles the pixel grid. See the view menu option of the same name for more details. |
| Float Above Other Windows | Makes Loupe’s windows stay above most other windows. See the view menu option of the same name for more details. |
When you open the Shortcuts settings pane for the first time, you’ll notice a message at the bottom of the window asking for permission to control your computer.

Even though you are granting fairly broad access to your computer, Loupe only watches for and intercepts the global keyboard shortcuts that you define using the control it is granted. Loupe will function perfectly well without permission to control your computer with accessibility access, you just won’t be able to make the defined keyboard shortcuts work globally (Loupe will need to be the foreground application for your shortcuts to work). If you don’t want to use global keyboard shortcuts, and don’t want to keep seeing this message, you can hide the message using the “Dismiss” button.
If you wish to use global keyboard shortcuts, you can grant Loupe accessibility access (permission to control your computer) by pressing the “Grant Permission” button, which will prompt you with the below alert.
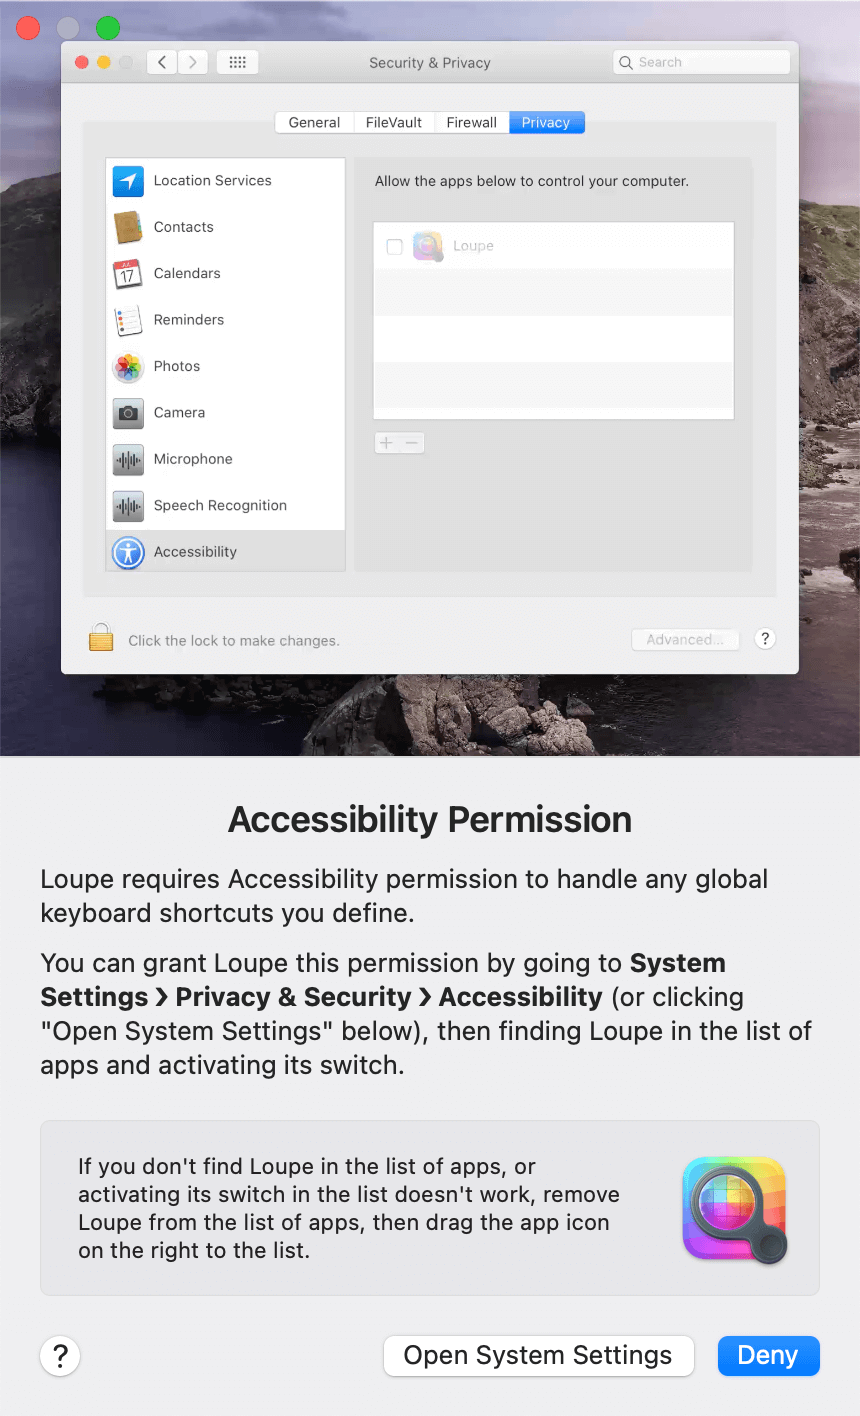
Pressing “Open System Settings” will open the Accessibility options in Privacy & Security in System Settings, allowing you to activate the switch to the right of Loupe’s icon. Once this is done, you’ve successfully granted Loupe the permission it needs for its global keyboard shortcuts, and they will start to function immediately.
The top portion of the alert is a short, looping animation that shows the steps needed (after the “Open System Settings” button is clicked) to grant the permission Loupe wants.
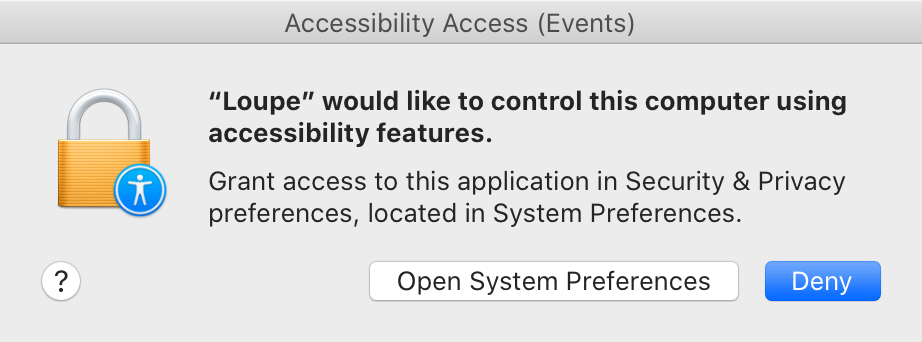
The system may show the below alert around the same time Loupe shows its own. You may either click “Open System Preferences” (”Open System Settings” in macOS 13 and newer) in the system alert, or press “Deny” to dismiss the alert and follow the instructions provided in Loupe’s alert (above).
Color Formats
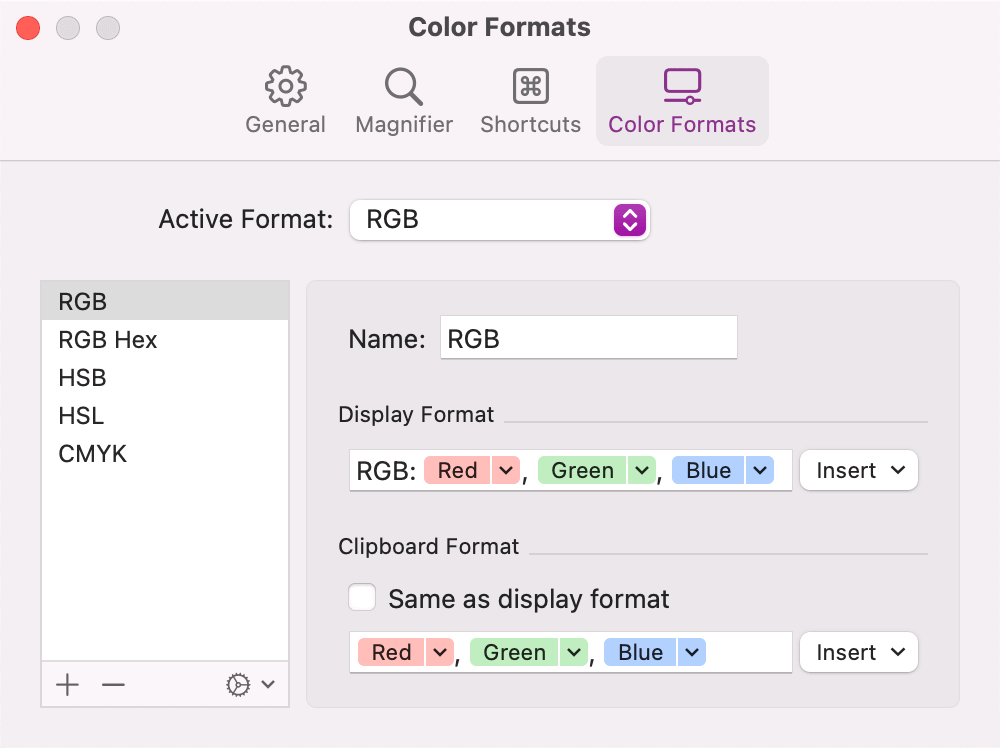
| Option | Description |
| Active Format | A drop-down menu containing all of the available color formats, in the order they appear in the format list. The selected item will be the color format displayed by the current pixel color field of the magnifier’s information view, and the color picker’s color output display button. |
Color Format Editing
The vast majority of the Color Formats settings pane is devoted to editing color formats.
- Format List
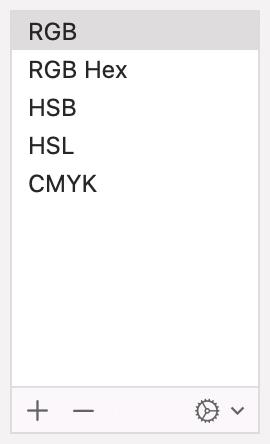
- This is a list of all currently available color formats that can be used. Selecting a color format in this list will allow it to be edited by the Format Editor. You can drag the items in the list to rearrange them, which affects the order of the items in the above “Active Format” drop-down menu.
Buttons labeled “+” and “-” appear below the list, and allow you to add a new format or delete the selected format. Alternatively, you can drag a format from the list onto either button to duplicate or delete the dragged format. There is also an options button labeled with a gear icon ““ that shows a menu allowing you to import and export color formats (holding the Option key allows you to export only the selected format).
- Format Editor
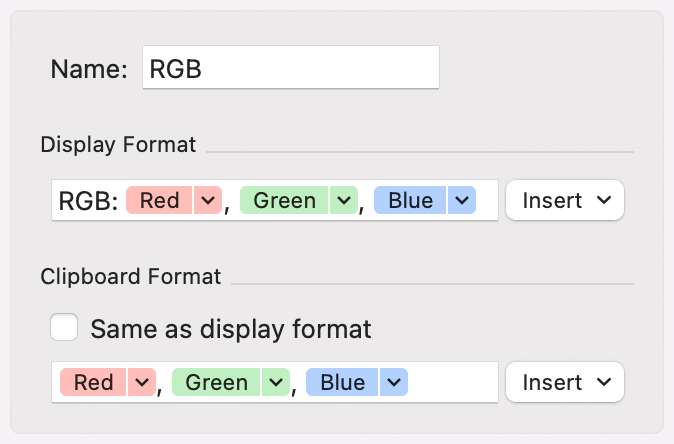
The first thing you’ll see in the editor is the name of the color format that is being edited. This is the name that shows up in the “Active Format” drop-down menu, the context menu of the information view’s current pixel color field, and the menu of the color picker’s color output display button.
Below the color format’s name, you’ll find both its “Display Format” and “Clipboard Format”. The display format defines how colors are described by the information view’s current pixel color field and the color picker’s color output display button, and the clipboard format defines how colors will be copied to the clipboard.
These both mainly consist of Format Fields, while the clipboard format also contains the “Same as display format” option which will cause the clipboard format to be exactly the same as the display format.
- Format Field
- Very basically, format fields are simple text editing fields that can contain both plain text and special color component tags. Next to the format field is a button labeled “Insert” that, when clicked, shows a menu with a selection of color component tags that will be inserted into the field when chosen.
The main purpose of the format fields is to allow you to customize how color components are formatted and arranged by using the color component tags (such as the “Red” component tag: Red). Each tag represents a single component of a color (red, green, and blue are three such components, as are hue, saturation, and brightness) from one of four potential color models: RGB, HSB, HSL, and CMYK. Loupe’s color formats can have any number of components from any of the supported color models, depending on what information you want.
An alpha component tag can also be inserted, and is meant for use with the color picker. The magnified view’s information view will always show a fully opaque color making the alpha component not very informative there.
Clicking the downward-facing arrow on a color component tag opens the component editor, giving you several options for how that component is formatted.
- Component Editor
- Each color component tag in a user defined color format has several different formats (chosen from the component editor’s “Format” menu) that control how the component is represented as a number. Each format has its own set of options, as described below.
| Format | Description |
| Integer | 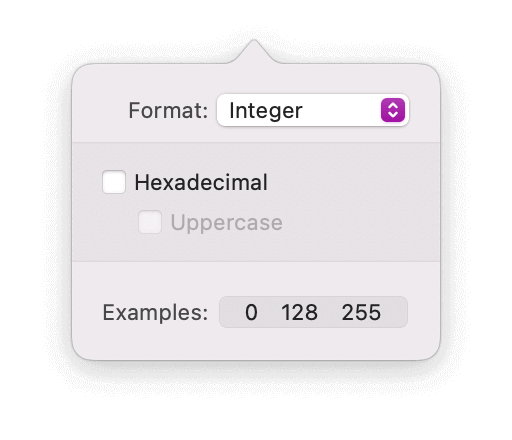 The component will be displayed as an unsigned 8-bit integer (a whole number between 0 – 255), with the option to display it in hexadecimal format in either uppercase or lowercase. |
| Floating Point | 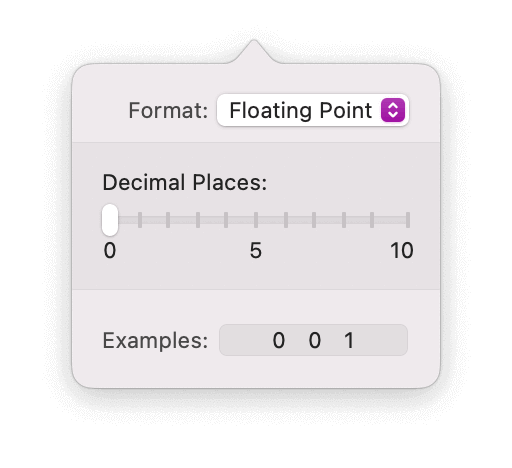 The component will be displayed as a number between 0.0 and 1.0 with the specified precision (number of decimal places). |
| Percentage | 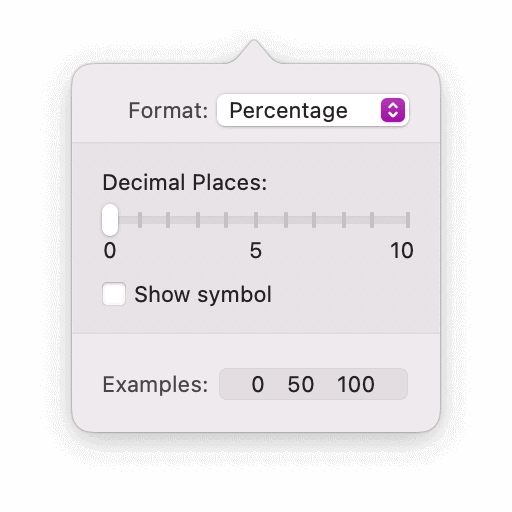 The component will be displayed as a number between 0 – 100 with the specified precision (number of decimal places). The percent sign (%) can optionally be added automatically when “Show symbol” is checked. |
| Degrees | 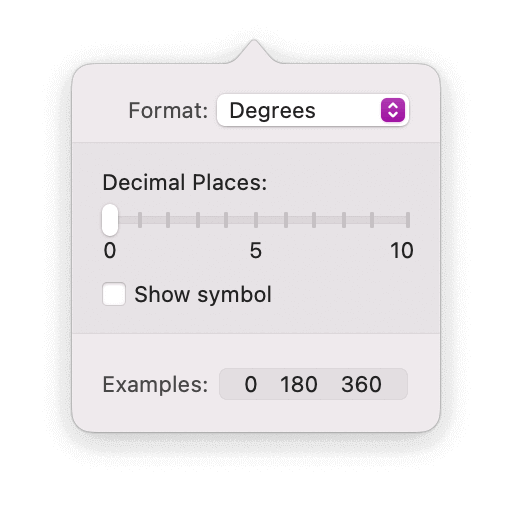 Only available for “Hue” color components (from both the HSB and HSL color models), which will be displayed as a number between 0 – 360 with the specified precision (number of decimal places). The degrees sign (°) can optionally be added automatically when “Show symbol” is checked. |